Companion guide
Color management in Resolve, actually explained.
The exact settings, with screenshots, taken a step further than the video goes. Plus output tagging: why your renders don’t always look like what you graded.
Start here
What color management actually is
It’s the math that converts your log footage into whatever space you work in, then converts that into your output space. That’s it. Any camera-manufacturer LUT that takes S-Log3 to Rec.709 is doing this: a crude, one-step version of it. The node-level setup below is the same idea, done in two deliberate steps instead of one, so you get a working space to grade in between them.
This guide covers node-level color management: you build the CST yourself, on the clip or the group. Resolve also has a project-level mode that automates this. Node-level is worth learning first because it shows you what project-level is automating for you, and that’s its own guide.
Setup
Project settings: set your working space
Project Settings → Color Management is where you set the working space every input CST in your node trees will target. In this project that’s DaVinci Wide Gamut / DaVinci Intermediate (DWG/DI), set as the Timeline Color Space. You can use others, but whatever you pick here has to match every input CST’s output, or the math downstream is wrong.
Input CST = camera log space → working space. Output CST = working space → delivery space. Also referred to as an IDT (Input Device Transform), and ODT (Output Device Transform).
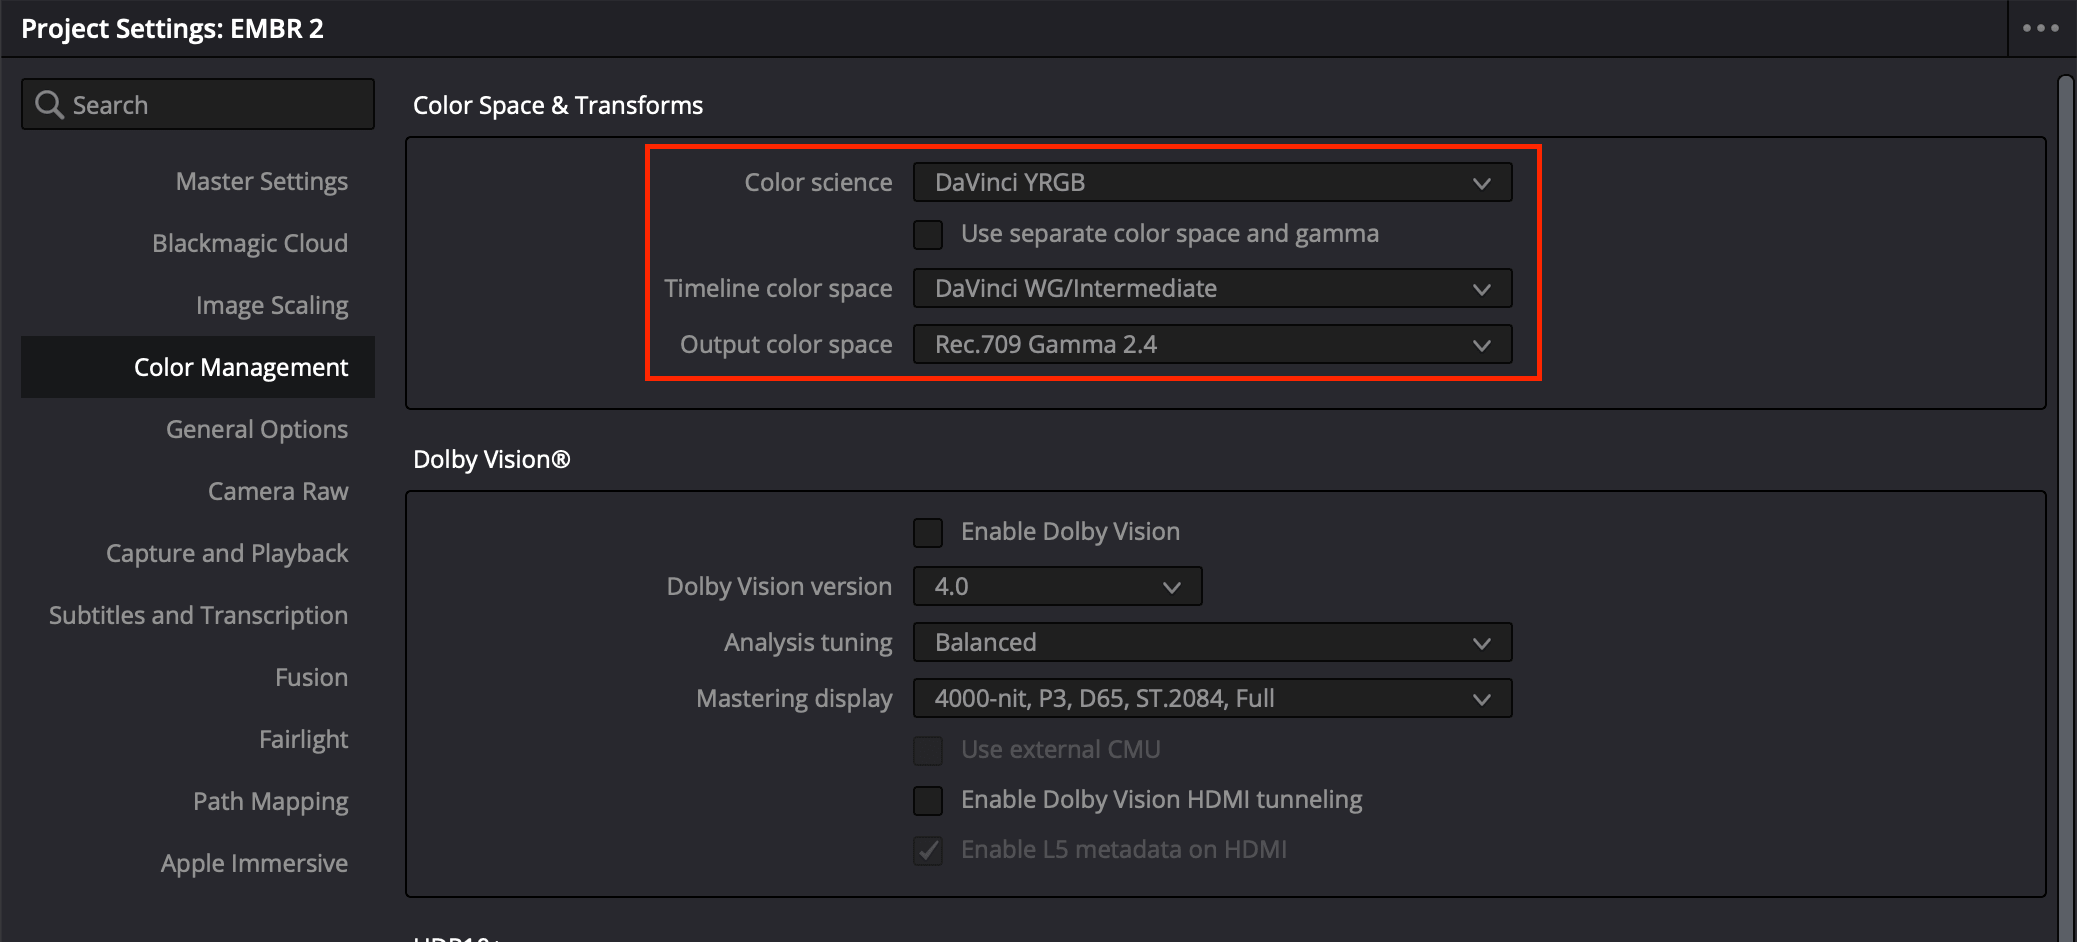
One setting worth changing while you’re in there: 3D lookup table interpolation sometimes defaults to Trilinear. Set it to Tetrahedral instead: better LUT interpolation, no downside.
Node level
The CST: your camera-in step
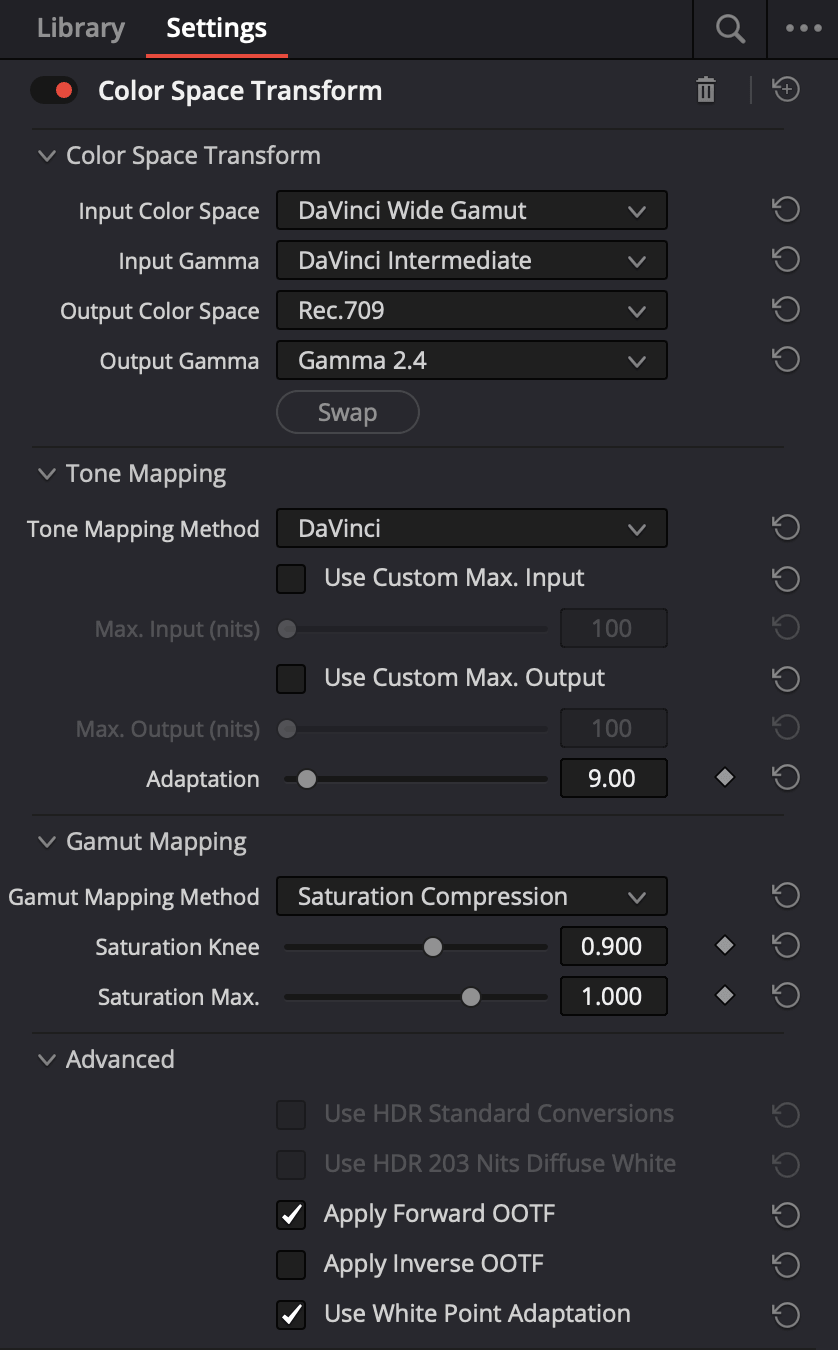
Nearly every modern camera has its own log space: S-Log3, LogC3, whatever. The CST (color space transform) maps that into your working space, so footage from different cameras can be graded, shot-matched, and balanced the same way. (You can use “Use Timeline” on the CST’s output to automate matching it to your project’s timeline color space. I have trust issues, so I set it manually.)
Setup: two node stacks at the clip level, not one
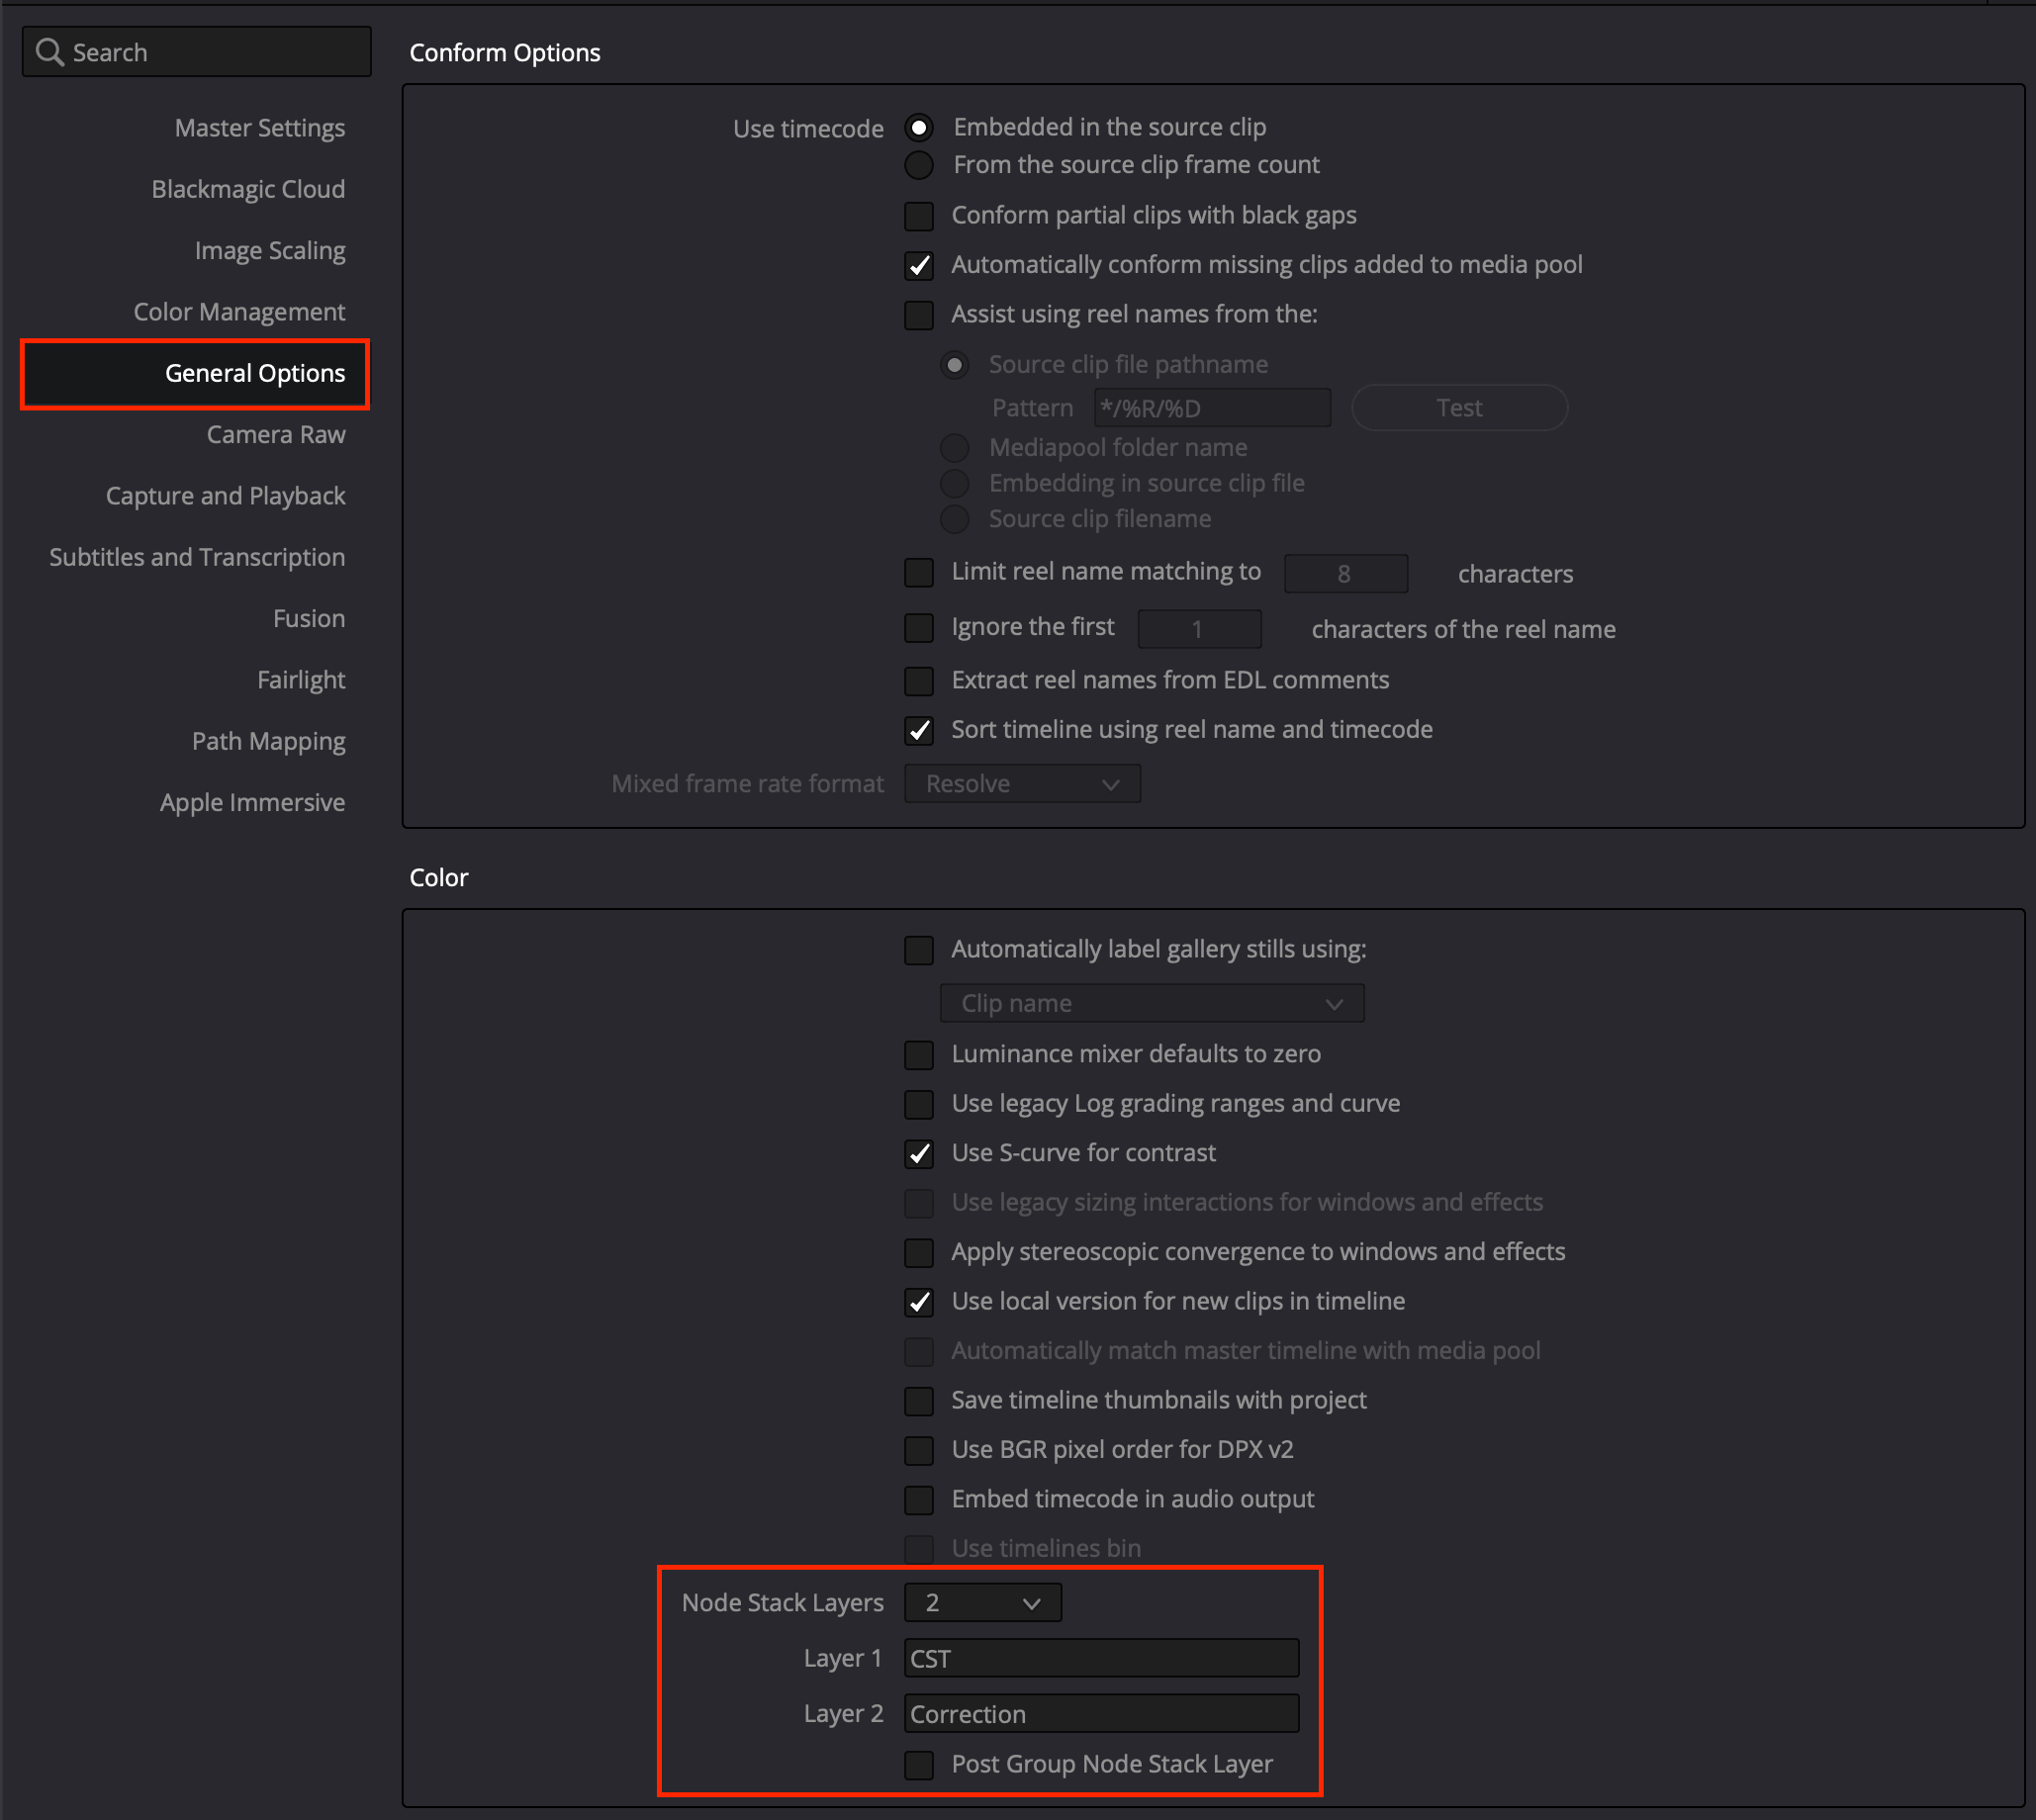
Project Settings → General Options → Color → Node Stack Layers, set to 2. Name layer 1 CST, layer 2 Correction. This splits what used to be a single clip node tree into two: the CST stack, and everything after it. The CST goes in the first stack, every shot-level correction goes in the second. Same clip, same node count either way, just organized so the camera-in step and the shot-level grading never end up tangled in the same node tree.
Apply Active Layer, not Apply Grade
This matters the moment you have two stacks. Apply Grade copies BOTH clip-level stacks, the CST layer and the Correction layer together, and overwrites any work already sitting in both on every clip you apply it to. When you only want to copy one layer, park on that stack and use Apply Active Layer: it copies just the stack you’re on and leaves the other alone.
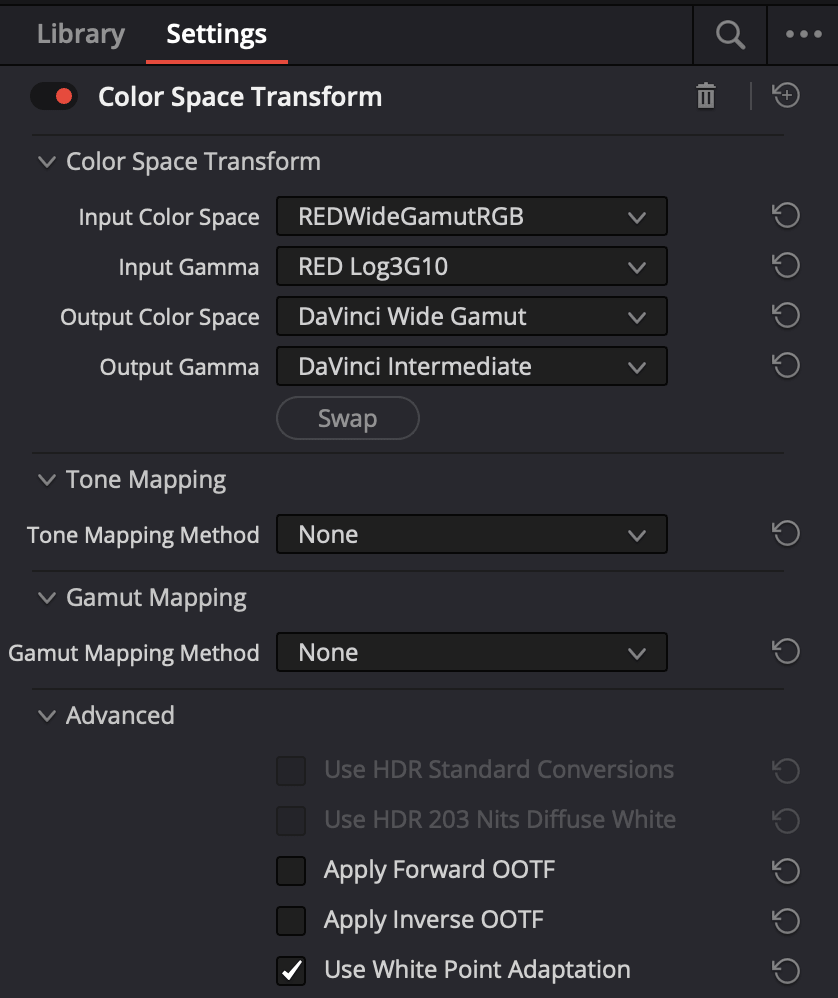
The CST is a per-camera fact, not a per-shot decision: every clip from the same camera needs the identical transform. Set it on one clip, then apply it to the rest without touching each one by hand: select every clip from that camera (a saved smart filter makes this a one-click selection, see Lightbox below), right-click the one you set up, Apply Active Layer. Or right-click the CST node and set it as a shared node before applying it: every clip sharing that node updates together the moment you change it, no reapplying needed later.
Scene-referred vs. display-referred: why tone mapping is off here
Scene-referred means the pixel values are still proportional to the light that hit the sensor. Log camera footage and DWG/DI are both scene-referred: different encodings of the same scene data, nothing decided yet about how any of it will look on a screen. Highlights can run past anything a display could show, because nothing’s been fit to a display yet.
Display-referred means the values have been mapped to what one specific display can actually reproduce: bounded, with a black point and a white point that fit the target.
This CST goes scene-referred to scene-referred: camera log into DWG/DI. It’s a re-encoding, not a decision, so tone mapping and gamut mapping stay off. Turning them on here would roll off highlights before you’ve even started grading, baking a display decision into a step that’s supposed to be neutral.
Node level
Groups: reserved for the scene, not the camera
A group gives you two extra node trees around the clip: a pre-clip that runs before every shot’s own corrections, and a post-clip that runs after. With the CST already handled by the node stack above, groups are free for one job: the look.
Why scene, not camera
You could still group by camera and put the CST in the pre-clip instead of the node stack, that works fine for a single-camera scene. It breaks down the moment a scene has more than one camera in it, a two-camera interview, an A-cam/B-cam setup, anything where the same look needs to land on footage from two different color spaces. Grouping by scene instead sidesteps that entirely: the CST already ran at the clip level before the group ever sees the image, so every clip in a scene group arrives at the group post-clip already speaking DWG/DI, regardless of which camera shot it.
Group pre-clip
Clip · CST stack
Clip · Correction stack
Group post-clip
Timeline
Usually empty
In a scene group with more than one camera in it, nothing happens here: the CST already ran before the group ever saw the image, so there’s no per-camera work left to do. If you group strictly by camera instead of by scene, this is where that camera’s CST would live instead.
Click a node: this is the actual node tree, left to right, the way it reads in Resolve.
Because every clip lands in the same DWG/DI space before the group ever touches it, the post-clip can treat a red-camera shot and a Sony shot identically. That’s the payoff: one look decision covers a whole scene, mixed cameras included, because by the time the look sees any of them, they’re already speaking the same language.
The payoff
Negative per scene, one print for the whole thing
This is what the group post-clip and the timeline node are actually for, and it borrows straight from how a film lab works: different scenes get shot on different negative stocks depending on what they need, then the whole reel gets printed through one consistent print stock. The negative can vary. The print doesn’t.
In Resolve, the negative is the group post-clip: run EMBR in Digital to Negative, then pick a stock for that scene. Because every clip in the group already arrived in DWG/DI regardless of camera, that one stock choice grades the whole scene at once, and different scenes can carry different negatives without looking like they belong to different projects. The look doesn’t stop at the stock, either: scene-level adjustments, printer lights, an overall balance or contrast move for that scene, live here too, inside EMBR or in extra nodes in the same group post-clip tree.
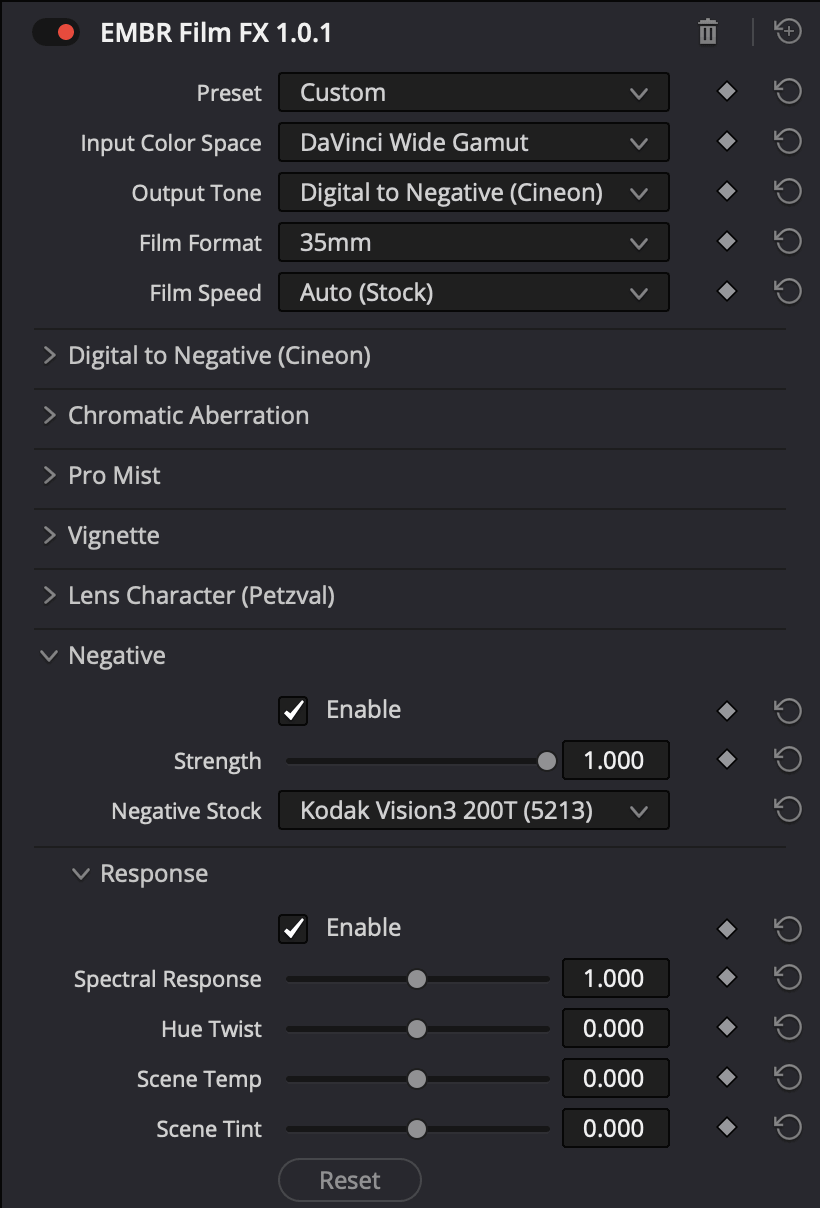
A print LUT isn’t the only way to keep a piece cohesive across scenes, you can grade for consistency scene to scene without ever touching one. What it buys you is a single, mechanical way to lay one consistent DNA over everything downstream of it, e.g. Resolve’s bundled Rec.709 Kodak 2383 (pick a white point, D55, D60, D65), even across scenes that were graded differently at the group level.
The print also does more than add a look: properly prepped, it performs the working-space-to-display transform too, the same job the output CST does. That’s why the typical DWG/DI → Rec709/Cineon CST doesn’t hold up as a terminal step on its own; Resolve’s Film LUTs are not meant for Rec709 primaries, which is why the colors don’t map as cleanly as the Digital to Negative transform built into EMBR’s DCTL and OFX. Use a properly prepped print LUT as your last node and you don’t need a separate output CST after it. The two usually aren’t paired, pick one.
Where it sits changes what it touches. At the timeline level, one print LUT catches everything downstream, including graphics and titles, which isn’t always what you want. Make it a shared node instead and drop it as the last node in each scene group’s post-clip, and it does the same job scoped to just that group’s clips, protecting anything at the timeline level that shouldn’t get the print treatment.
None of this is mandatory. You can finish a look entirely at the scene level and skip film emulation altogether, or do the whole grade at the timeline level with no groups at all. This is one way to work, the way that’s been working, not the only correct shape for the node tree.
Node level
Lightbox: organize before you group
Top right corner. Lightbox shows every clip in the timeline as a grid you can size, inspect, and sort: the fast way to find which clips belong to which camera before you start assigning groups, especially once a timeline has more than a handful of shots.
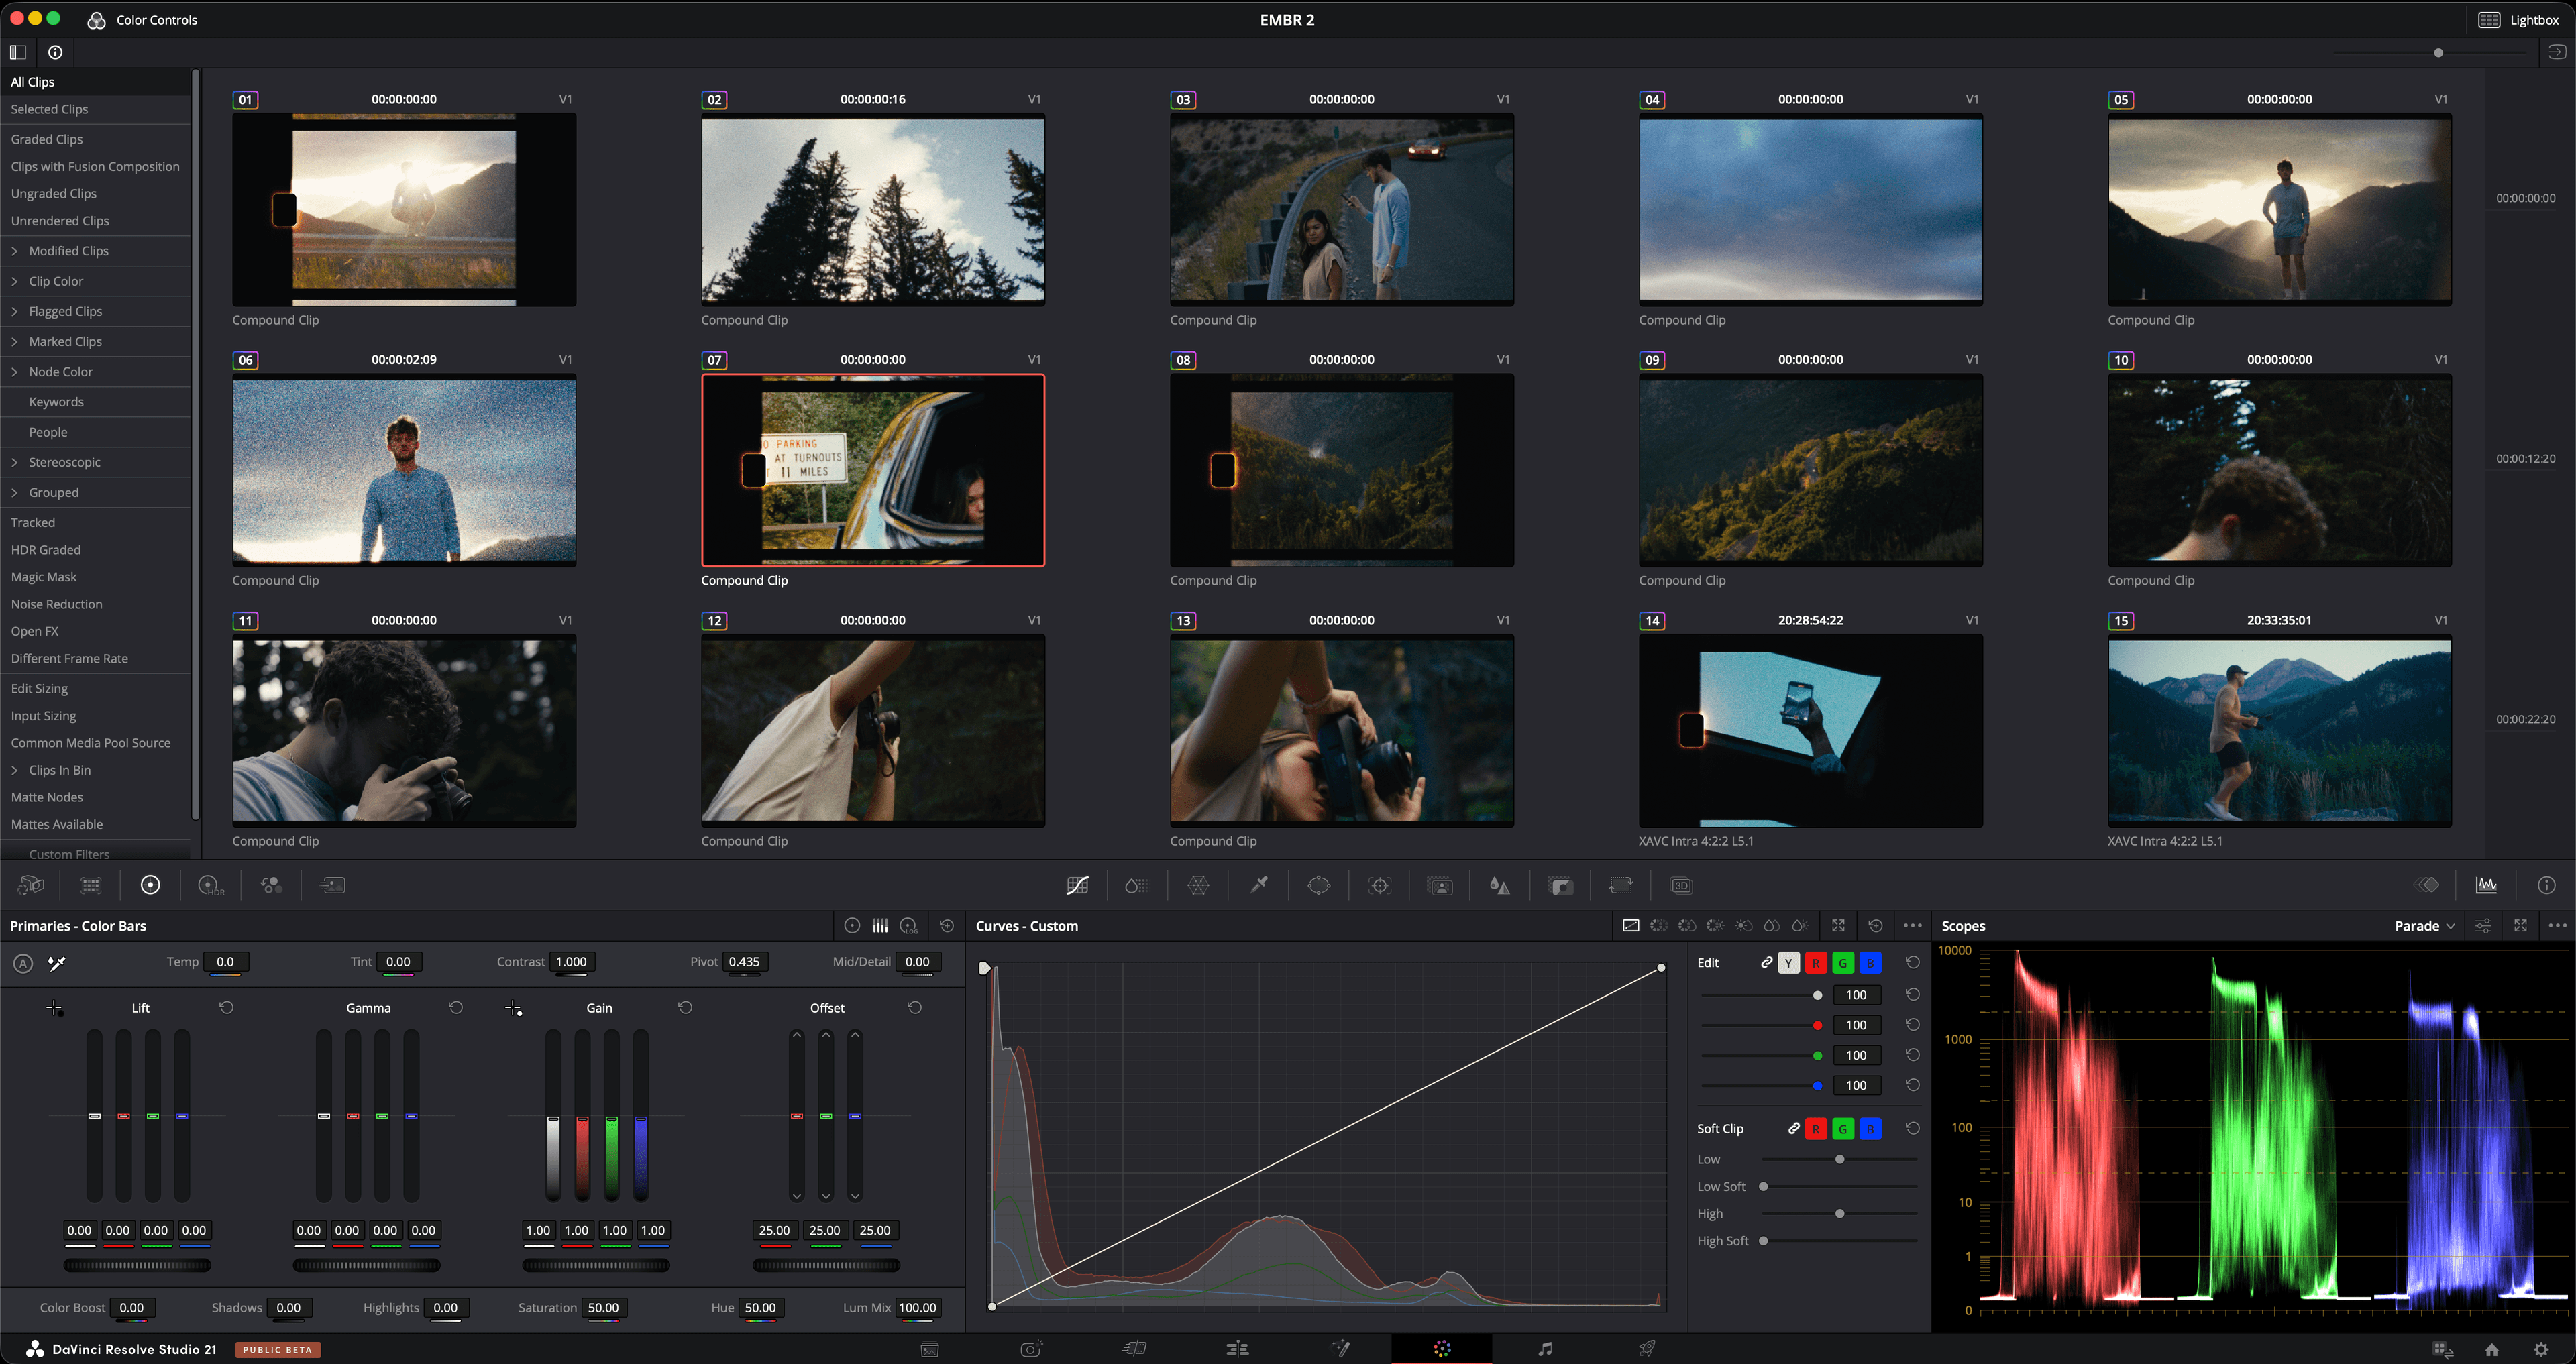
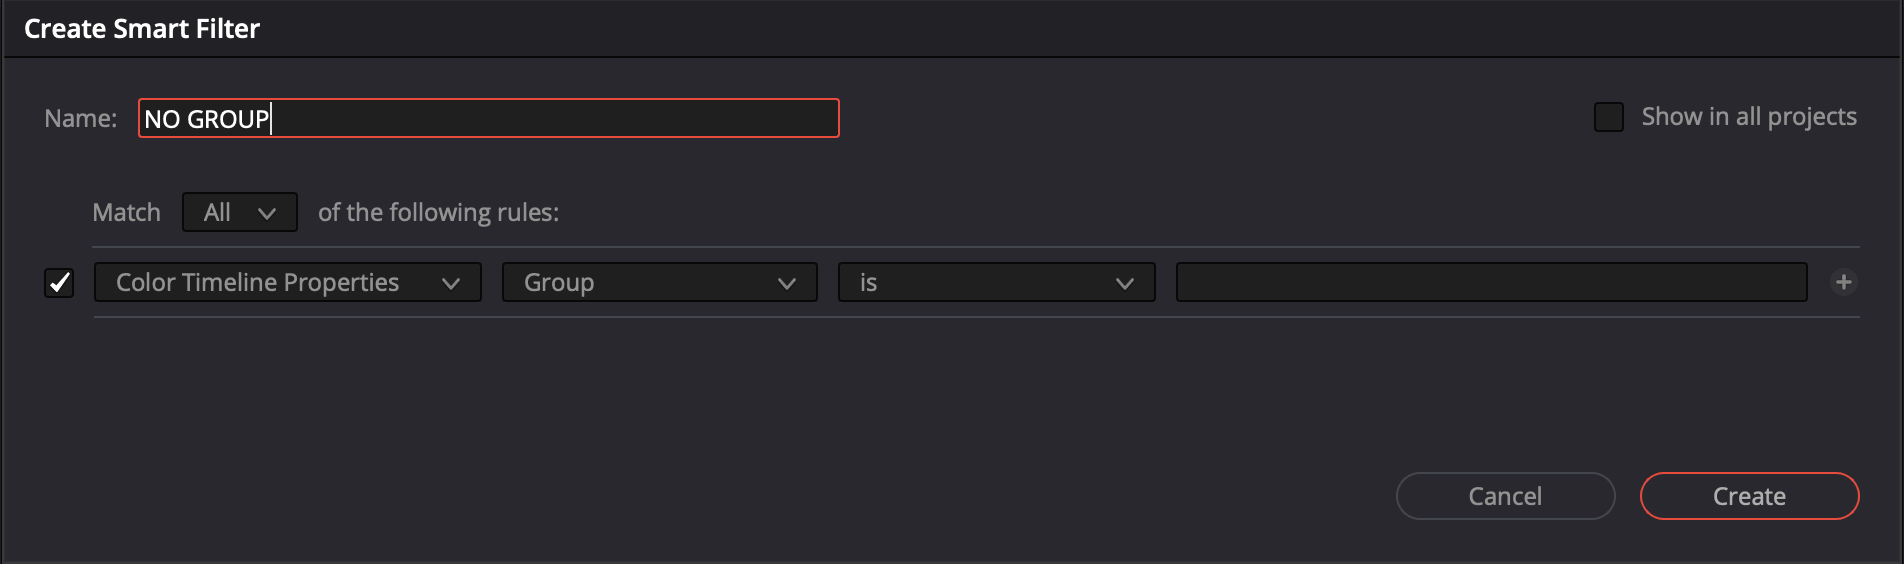
The left-side panel sorts and filters: by media pool bin, by flag or color tag you set on clips, or by a smart filter you build. One worth setting up: a filter for “no group” (every clip that hasn’t been assigned to a group yet). Run it after you think you’re done and it catches anything you missed.
Building a smart filter, e.g. isolate one camera
New Smart Filter, top-level category Media Pool Properties, then a property and an operator: File Name contains a string that’s unique to that camera’s naming convention, or Codec is a specific codec if two cameras don’t share one. Either isolates every clip from that camera in one pass, timeline-wide.
Rename it from the generic “Smart Filter N” to something you’ll recognize later, Red, Sony, whatever fits your shoot. Check Show in All Projects if it’s a filter you’ll want available on the next job too, not just this one.
Once saved, it’s not just for building groups. It shows up in the Clips dropdown at the top left of the Color Page, next to Media Pool, so you can filter your entire timeline view by camera at any point, regardless of which group each clip ended up in. Useful the moment you need to go back and fix a CST across every clip from one camera without hunting through several scene groups to find them.
From here, select every clip that shares a camera (click first, shift-click last, or sort by bin first) and add them into a group in one pass, instead of hunting through the timeline shot by shot.
Grading from Lightbox: know which node you're on
Lightbox can dock a full color panel right below the grid, so you can grade without leaving the grid view. Handy for a fast pass across a lot of shots at once.
The catch: the grid doesn’t show you the node tree, so it’s easy to grade the wrong node without noticing. Check which node is actually selected before you touch a wheel. This matters especially with groups in play, where a stray adjustment on the wrong node lands on every clip in that group, not just the one you’re looking at.
Delivery
Output tagging
Getting the timeline color-managed isn’t the last step. The exported file still needs to be told what to do with the pixels you built. Skip this and the grade you approved in Resolve can look murkier, darker, or more contrasty the moment someone else opens the file.
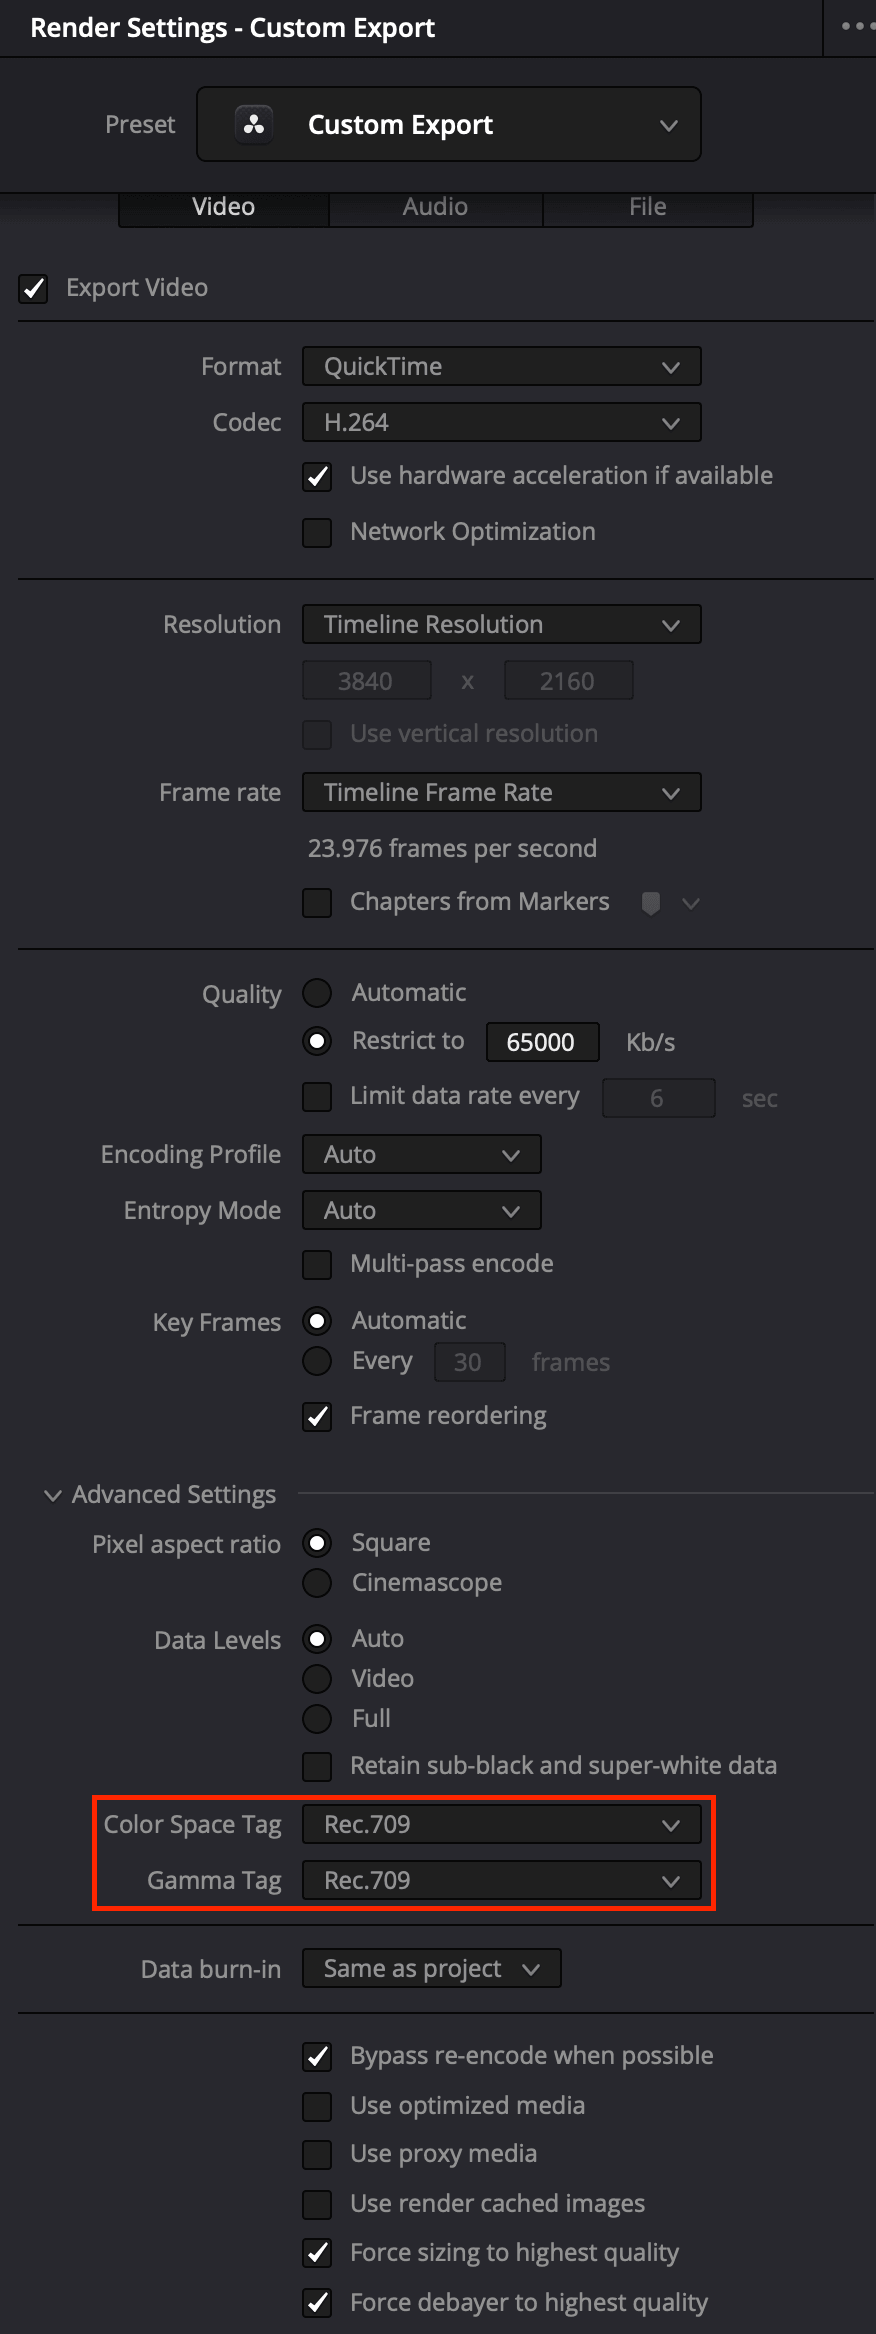
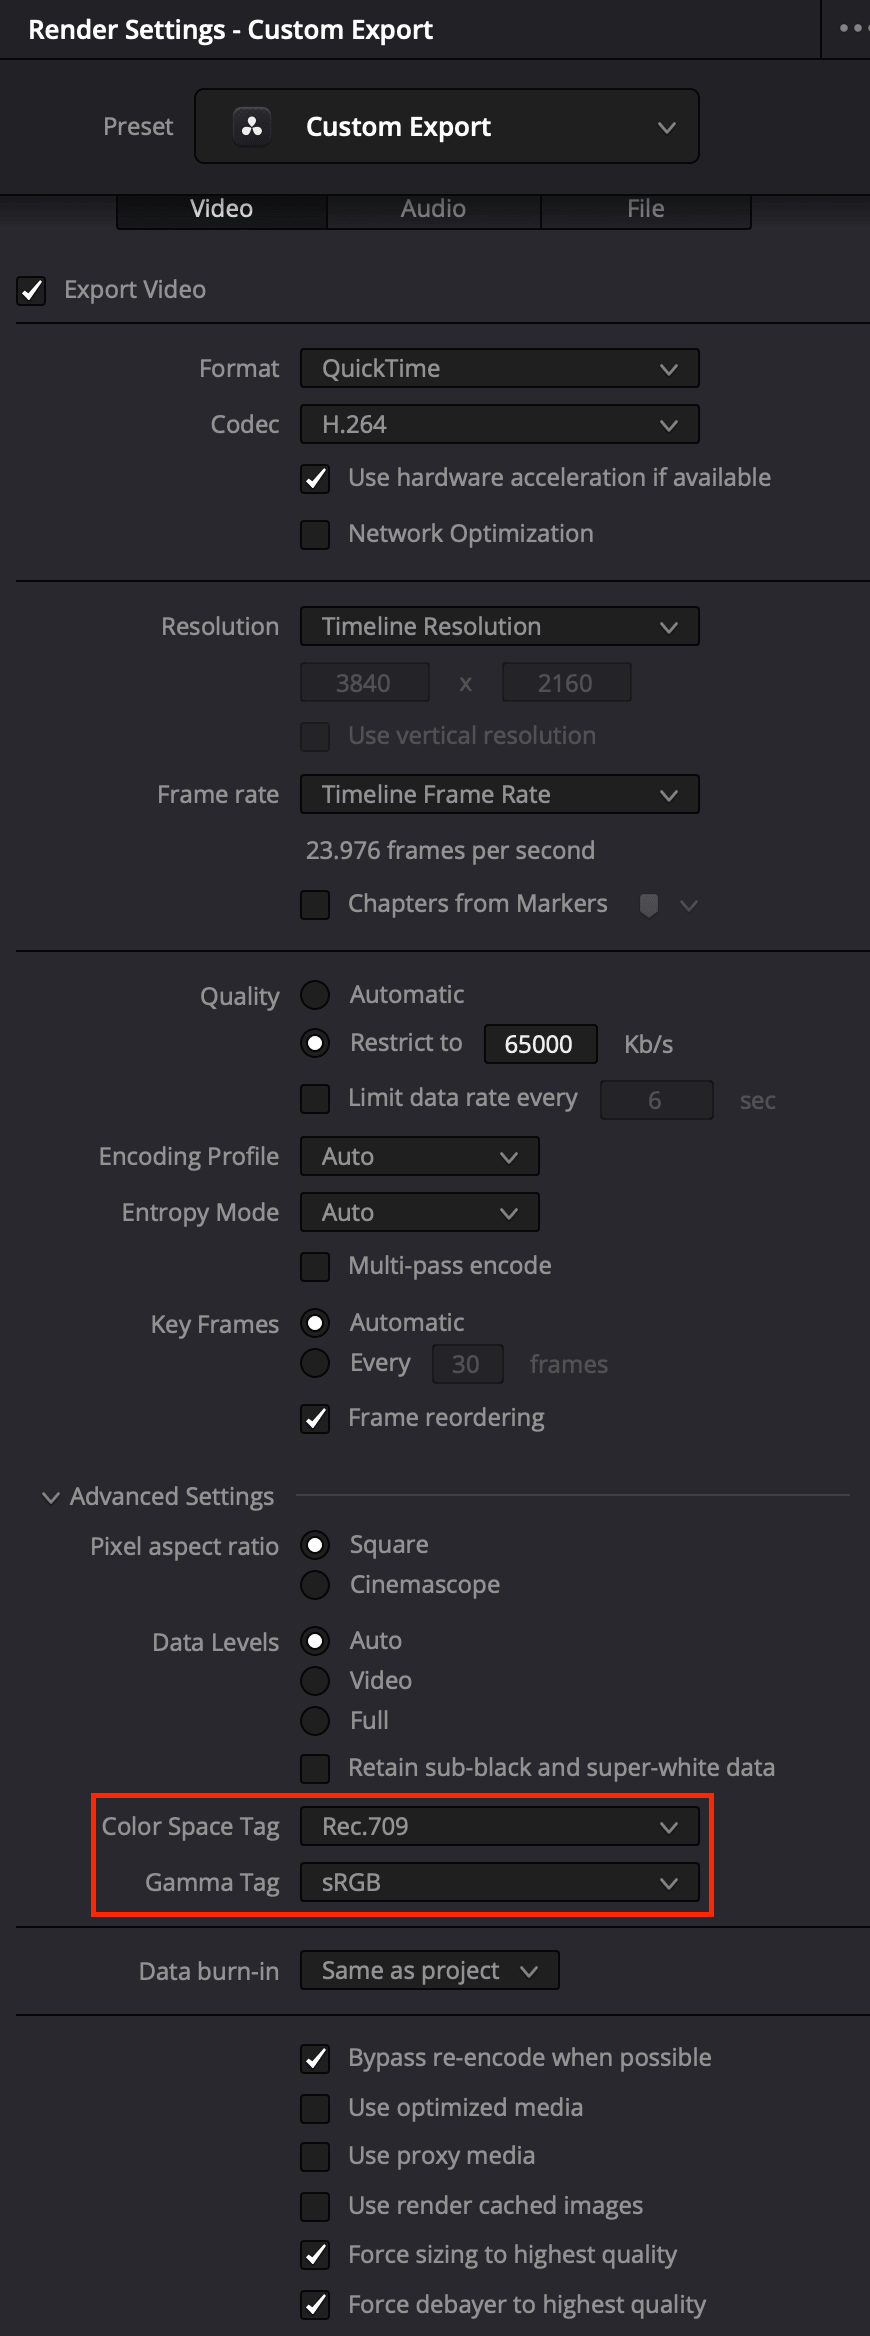
An NCLC tag isn’t “what space is this file in.” It’s an instruction to whatever decodes the file: assume this transfer curve. Two tags matter for most delivery:
Which tag, and why
1-1-1 is true Rec.709: the full BT.1886 decode, roughly gamma 2.4. Correct by the spec, for broadcast and calibrated reference-monitor delivery.
1-13-1 is Rec.709 primaries with the sRGB transfer curve, roughly gamma 2.2: what a computer monitor usually assumes. This is the one for YouTube and most web delivery.
Most real-world playback doesn’t properly implement the BT.1886 decode 1-1-1 promises. It decodes closer to 2.2 regardless of the tag. Grade and tag true 2.4, and most screens play it back too dark and too contrasty. Pick the tag whose failure mode is safe. If a platform ignores your tag and does a naive decode (common on the consumer web), 1-13-1 barely changes. 1-1-1 crushes.
Tested end to end rather than assumed: a file played locally through QuickTime or Preview on a Mac, and that same file watched on YouTube through a Mac browser or the YouTube app, reads correctly at 1-1-1. The same YouTube upload watched on Windows, iOS, or Android reads correctly only at 1-13-1; 1-1-1 comes out gamma-shifted, too dark and too contrasty there.
Becasue there are so many different potential hardware and software and delivery combinations, its worth testing on your own setup before treating a particular combination as law: render a test file, upload it to the platform you’re delivering to, and check it on the devices you expect your audience to use. If you see a shift, swap the tags. Simple as that.
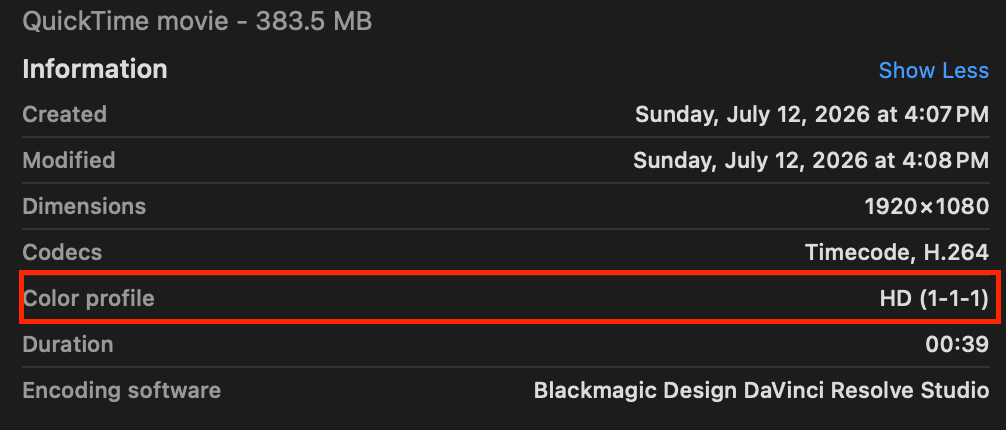
To confirm what actually landed on an exported file, check it in Finder: select the file, Get Info, Color profile.
Keep this to the tag, not the pixels. Grade and monitor at true Rec.709 gamma 2.4, calibrated, same as always, and render at that same 2.4. The only thing that changes for a 1-13-1 delivery is the Gamma Tag, set to sRGB. That’s an instruction, not a pixel remap: you’re not baking a different curve into the file, you’re telling whatever decodes it to assume one. Switching Resolve’s actual output curve to its own sRGB option instead of leaving it at 2.4 does the remap for real, which skips the tag doing its job and isn’t necessary for a safe 1-13-1 delivery.
On Instagram: sRGB as the output gamma tag (2.2 gamma) can read slightly more accurate on Instagram and a few other apps that decode a little differently than YouTube does. If your Instagram exports look more contrasty and darker than what you graded, that’s the first thing to try.
Up until now, we've handled the delivery aspect of a consistent image. But it's all null and void if what you're viewing in Resolve itself doesn't represent the true image.
macOS only — everything from here to the end of this section
The next three steps (the display preset, the Resolve viewer preferences, and the Rec.709-A toggle) exist only on the Mac build, because they’re about how macOS and Resolve talk to your display through ColorSync. On Windows, none of these settings exist and none of this applies: the viewer follows your display directly, so a calibrated monitor is the whole job, and the 1-1-1 vs 1-13-1 decision above applies exactly as written.
On a Mac, start at the system level, before you touch anything in Resolve: System Settings → Displays → click your display → Preset, and set it to HDTV Video (BT.709-BT.1886) if it’s offered (Apple Silicon Macs, and Reference Mode on higher-end displays like Studio Display and Pro Display XDR). This locks the panel itself to true Rec.709 primaries and real BT.1886 gamma 2.4 in hardware, and locks out True Tone, auto-brightness, and the brightness controls for as long as the mode is active (Apple’s own wording: they “might not be available” in reference mode). Both of those quietly shift what you’re seeing without you touching a grading control. It works underneath ColorSync rather than through it, so this is the more direct fix: the panel is correct, instead of Resolve compensating for a wrong assumption downstream.
Next, in Resolve’s preferences, turn on Use Mac Display Color Profile for Viewers. This is what makes Resolve actually respect the system preset you just set, instead of assuming its own default. macOS has historically read Rec.709 through a simplified ~1.961 gamma approximation instead of the real BT.1886 2.4 curve, which is the entire reason Rec.709-A exists (a compensating gamma shift baked in specifically to cancel that mismatch). Since Resolve 20.2, Rec.709 Scene also sends the correct ColorSync metadata directly, which covers what you see while grading. Neither of these steps covers what happens when your exported file lands on someone else’s Windows laptop or phone. That’s still the 1-1-1 vs 1-13-1 decision above.
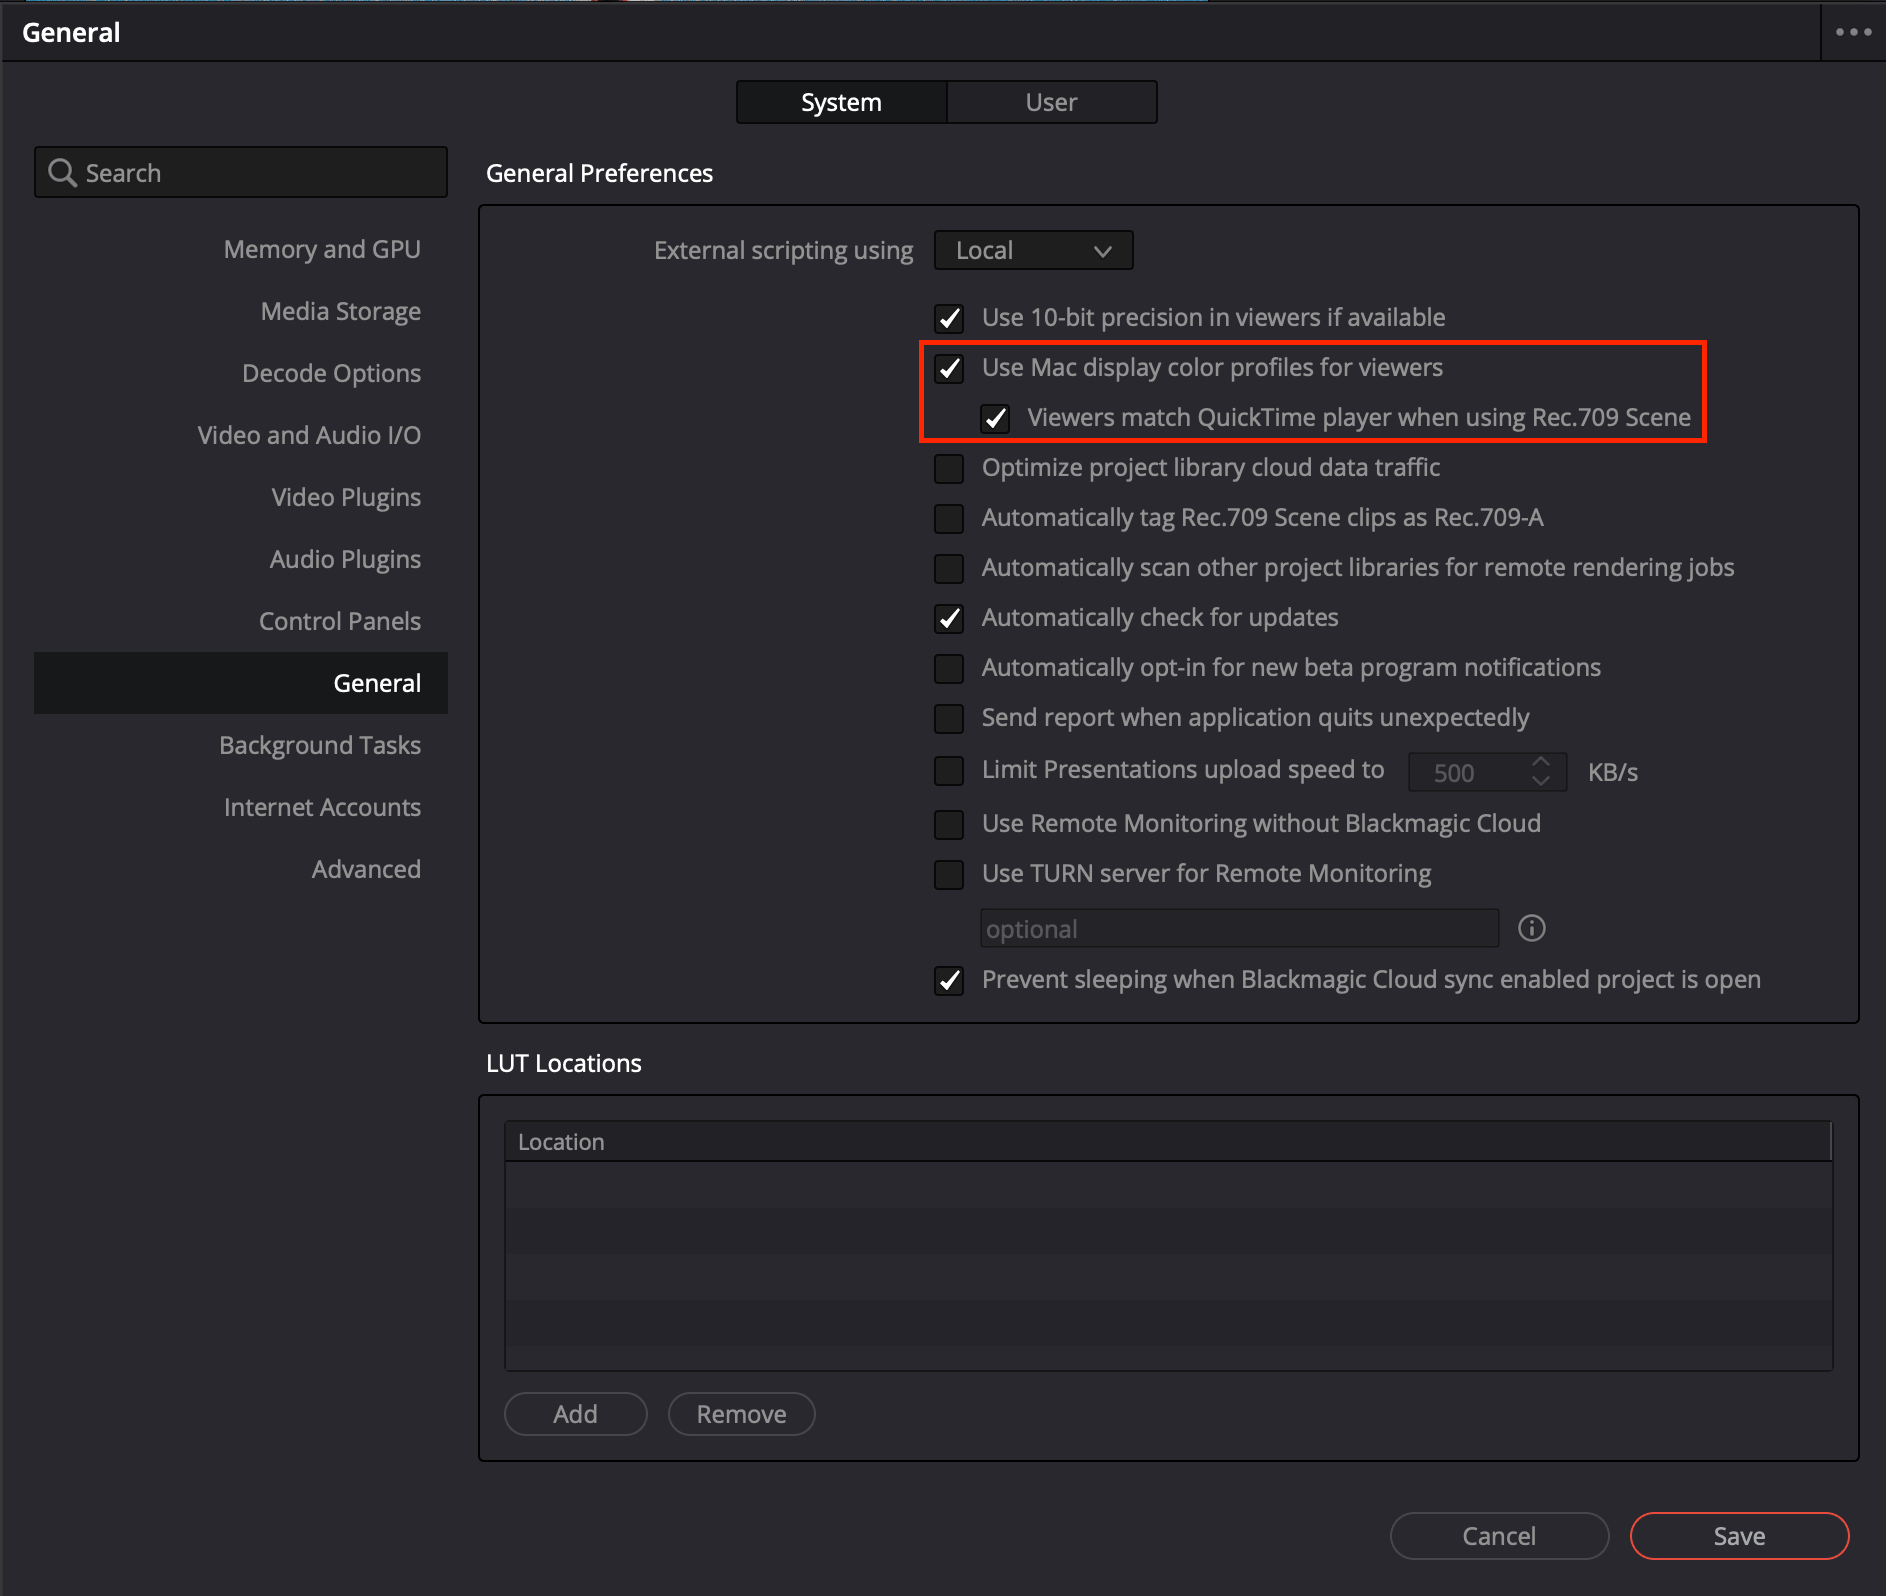
Sitting right above those two in the same panel: Automatically tag Rec.709 Scene clips as Rec.709-A. Leave it off if you’re choosing your NCLC tag deliberately per the framework above. It would silently override the call you just made.
None of this guarantees pixel-identical playback everywhere. YouTube, Vimeo, Instagram, and TikTok all decode slightly differently, and that’s not fixable from your end. The goal is a calibrated, zero baseline: tag correctly, and whatever drift remains is the platform’s, not a mistake you made.
Where to go from here
This is node-level setup: you build the CST and manage the transforms by hand, into whatever working space you land on. That’s the same idea EMBR’s OFX tool uses for its own Input Color Space setting. Point it at the space you built your CST into (DWG or otherwise) and the tool receives exactly what it expects, no extra transform needed. The DCTL kit is narrower: those are built and locked to DWG/DI specifically, so if you’re working with the DCTLs, that’s the working space to standardize your project on. See how EMBR manages color or go see what EMBR does.
The next guide
New videos and guides, when they land — once a week at most, usually less.